Violet infusion ice cubes for sick dogs (or humans)

1404099866849

My girl Bonnie has Lymphoma,  as I mentioned in the Rainbow Bridge post. I want to keep her as healthy and comfortable as I can while shes with us.
I give her 1 violet infusion icecube each day. She loves the way they taste. They taste like green beans to me.
Among other things, Violet is know for assisting the lymph system. It helps clear lymph nodes. What better way to care for my girl while shes living with lymphoma?
I read that, on average, dogs diagnosed with lymphoma usually live 2-4 months after diagnosis,  without treatment. It has been almost 5 months since Bonnie was diagnosed.

Heres how I make violet infusion.

Ingredients:
2 heaping cups of violet flowers (stems removed)
2 cups boiling water
1 quart sized mason jar with lid and band.

Fill the mason jar with the violet flowers.
Pour boiling water over the flowers.
Attach lid and band tightly.
Allow to rest on counter for a minimum of 4 hours, maximum of 24 hours. (It will spoil or lose its potency after 24 hours)
Filter the flowers from the infused water into a large bowl.
Place flowers into a towel or cheese cloth and squeeze the remaining liquid out of the flowers and into the bowl.

You now have infusion!
Pour the infusion into desired ice cube trays.  Store in freezer (did I really have to tell you that).

My Bonnie girl is about 40lbs. I only give her 1 cube a day. Violet can cause nausea and diarrhea in large quantities. I was giving her two a day and she seemed fine but then we had a day of throwing up, which may have been completely unrelated,  but nonetheless I reduced the amount cos I don’t want to go through that again.

If you don’t have the time to use the infusion immediately,  you can freeze it. Just thaw it when ready to make Easy Violet Jelly or additional icecubes.


*Update: After 8 months of fighting lymphoma, We had Bonnie euthanized. Her illness suddenly progressed quickly.
She was at home with her family when she passed. She is buried on our property. She took a huge part of our hearts with her.
You can read the story of her last days on earth, here. *

I am not a doctor. I am not a professional.  These are strictly my opinion. You don’t have to follow my opinion. Use at your own risk cos I didn’t tell you to do it. 🙂

Fermented Chicken Feed

1404099507883

The women in my Ladies Homestead Gathering group introduced me to fermented chicken feed. Bascially it is feed that has been soaking in water for a few days.

Why the heck would you want to soak your chicken feed? For me, I was concerned about mice and saving money. How does fermented chicken feed keep mice away? Well, the chickens love fermented feed and eat every crumb of it, leaving nothing for the mice to eat. How does fermented feed save me money? As I said, THE CHICKENS LOVE FERMENTED FEED and eat EVERY crumb of it. They don’t scratch through it and only eat the bits they like, spilling the rest on the ground (FOR THE MICE TO EAT!)

For those two reasons alone I was willing to try fermenting my chicken’s feed. But knowing that my chickens also absorb more nutrients from the fermented feed is another fantastic benefit. Fermented feed is also said to help chickens recover from molting more quickly. There are so many more benefits from fermented feed. Here is a great article on Fermented Chicken Feed from Natural Chicken Keeping.

Most of the methods I have heard of use a two 5 gallon buckets, one with holes drilled in the bottom. Put the feed in the bucket with holes drilled in the bottom then place the bucket inside of bucket number 2 (without the holes). Pour water over the feed until covered. Let it sit for 3 days, keeping the feed covered with water. On day 3, lift the bucket containing the feed out of bucket 2 and allow the water to drain into bucket 2. Serve to chickens.  This is a simple method that works well for larger flocks.

I have 5 chickens. I don’t need that much feed. Heres my method. I found this method on OhLardy.com . It works great for me and I wanted to share it along with a few tips I learned along the way.

What you need:

3 jars with lids

chicken feed

water


Start small!20140507_081125

I made the mistake of making a large batch before I would know if my chickens would eat it or not. I’m new with chickens, and my chickens are babies. They are still trying new things and are not sure of everything I put in front of them. So I made 2 cups of fermented feed for 3 days and the chickens wouldn’t touch it. 6 cups of feed went to waste (I WAS PISSED).

I have 5 Buff Orphington Chickens. They are about 10 weeks old. I have found that 1.5 cups of dry feed is right amount for them. You will have to adjust this for the size of your flock. And remember start small. Maybe try 1/2 a cup for the first 3 batches, then move up once you feel confident. We DON’T want to waste feed.

Also, if your chickens try it, look at you like your crazy then walk away (like mine did). Try adding dry feed on top of the fermented feed. Or maybe a few meal worms or other treat. My girls don’t like to try anything new but once I coax ONE of them into trying something the others will join in. My girls go crazy for the stuff now!

Use a larger jar!

If your new to fermenting anything, like me, you will quickly learn that fermented stuff bubbles and expands. Use a jar that is about twice the size of the amount of feed you’ll be using. If you don’t have big enough of a jar, you will have a stinky mess on your counter.

Use paper towels!20140512_071527 (1)

Even if you use a larger jar, sometimes the fermentation process can get a little wild and still manage to bubble over leaving a stinky mess on your counter. Make a little paper towel mat for under your jars. Better safe than sorry.


The Process:

Dump feed in jars.

Add water until all feed is wet and covered by about 1″. You may have to stick a knife in the feed and dig around to get water to the bottom feed.

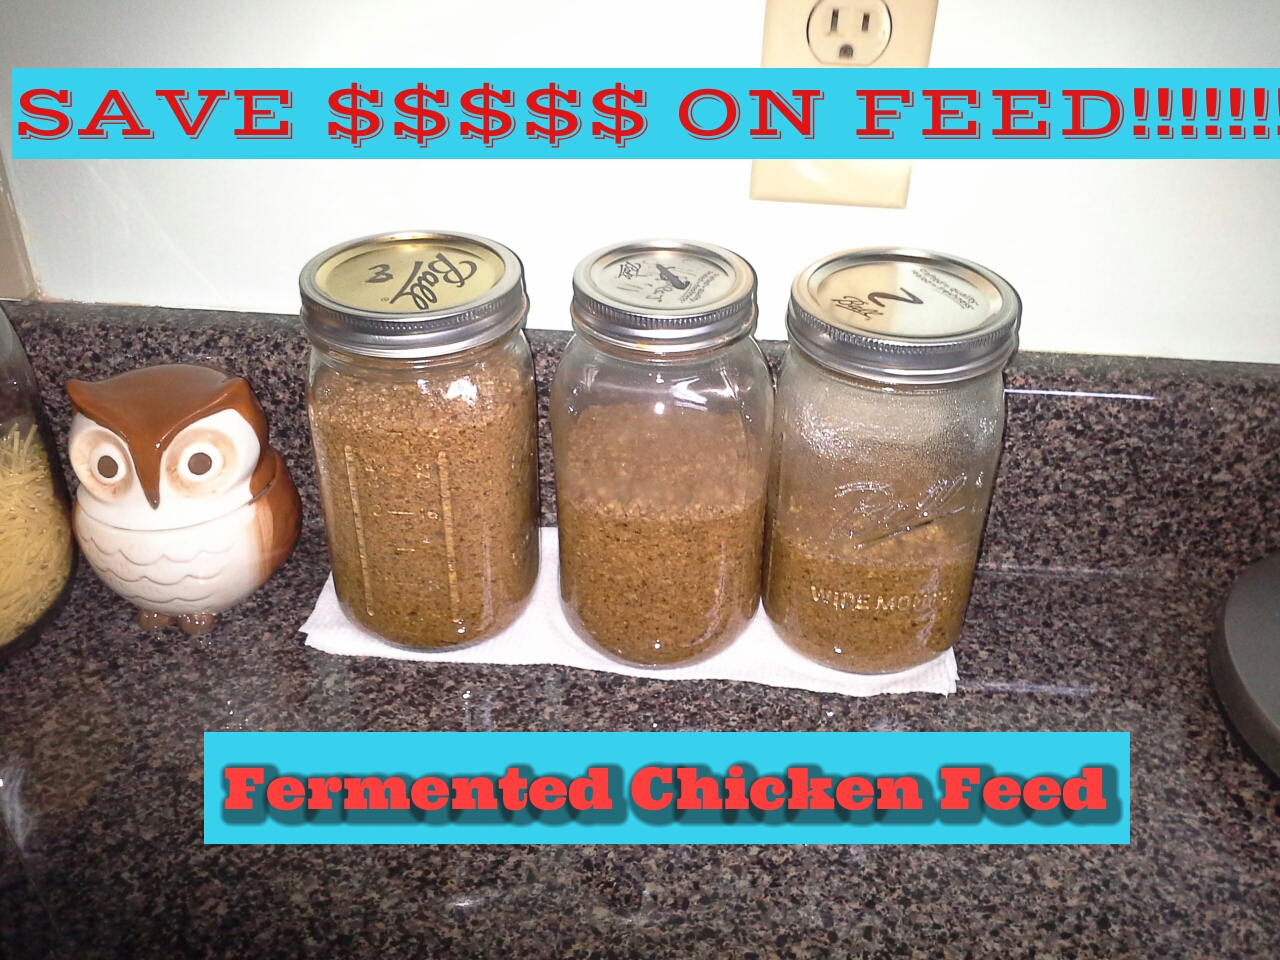
Put lid tightly on jar.

Write the number “1, 2, or 3” on top of the lid depending on what day of the 3 day cycle you are on.

Set jar on paper towel mat on counter.

Repeat process every day for 3 days.

At the beginning of day 4, feed the contents of the day 1 jar to your chickens. Clean out the jar and begin the process again.

Thats it.

If its too wet when you serve it to your chickens, just add a little dry feed.

20140508_072259

A few ideas:

I have read about adding whey to the feed before you add water. I haven’t made Whey yet, but I will be trying that soon and I’ll let you know how that goes. I add garlic to the feed before I add water. You can also add vinegar if you like. I add vinegar to their water so I don’t want to over do it. I’m thinking you could add seeds and they will sprout, but I’m not sure about that. I don’t know if the fermentation process will stop the sprouting process. Like I said, I’m new to fermenting. But I’ll give it a try and let you know how that goes, or if you try it let me know how it goes for you!

Please let me know how your first time fermenting feed goes, or if you have any tips or tricks to share!

20140508_072638

20140508_104833

What Makes a Good Chicken Coop?

When I first started trying to figure out how to build a chicken coop I was a little overwhelmed.  Dimensions and positions and wire gauges. How the heck can you fit 9 chickens in 3 nesting boxes?! I drew up plans. I drew more plans. Ultimately what happened is I just got out there and started building it and worked on design as I built it. I did do research on requirements for a good coop.

– It has to be safe. If your worried about predators (like I am) then you need to take extra precautions to protect your fluffy butts.Consider building the coop raised off the ground. This will prevent predators from digging into the coop. If your design is built on the ground, bury 1/4″ hardware cloth below the coop floor before building.Use 1/4″ hardware cloth on all coop openings.  This is the hardest material for predators to claw through.Use double motion locks such as safety gate hooks. Single motion locks are very easy for raccoons (and other wise guys) to open.

-It has to be dry. I invested in the coop roof above all other materials. I went with a galvalume metal roof. It had to be special ordered. Its a bit thicker than whats available on the home improvement store shelves. We live in a heavily wooded area and I was concerned about tree limbs. Originally I wanted the clear corrugated roofing, but I read many reviews stating that they cracked, leaked and broke easily when branches landed on them. Here is what I bought.

-It has to have ventilation. The more ventilation the better!  Proper ventilation reduces ammonia build up which is a major cause of respiratory irritation for chickens. Also make plans on how to close off those ventilation windows during inclement weather.  It could be as simple as a tarp as long as it gets the job done.

-It has to have light. Chickens need light to produce eggs. Natural light cycles also promote healthy sleep habits which is important for over all health. Sun light also kills bacteria.

-It has to have room. A coop needs to supply a minimum of square 3′ of floor space per chicken. I have 5. I need a minimum of 15’of floor space. But I read over and over to build it bigger than you think you need it because chickens are addictive and they end up multiplying. Also, the more space they have the less squabbles there will be. They chickens has room to mine their own business. My coop has 32′ of floor space. I hate squabbling. Those are the Have to’s of chicken coops. Thats it. Chickens will lay eggs whether they have a nesting box or not. They can sleep on the floor. I’m not saying thats the BEST for them, its just not required.

-It should have a roost. Look, my chickens still huddle in the corner of the coop on the floor. Is it going to kill them? No, but it’s not whats best for them. Roosting, basically, keeps them from sleeping in poop. Chickens poop a lot. Even when they are sleeping. On a roost, the chicken’s poop will fall to the floor, and they stay out of it. Simple.

-It should have nesting boxes. Nesting boxes provide a secluded, reserved spot for laying eggs. If you train your chicken to not sleep in the boxes, the eggs will stay clean. Having a nesting box also keeps eggs from getting broken which prevents chickens from eating eggs (which is a whole nother problem you’ll have to solve). If you really want to give your girls the best, add curtains to the front of the boxes. This gives them extra privacy. Yes, chickens appreciate privacy when laying. The size of the nesting box depends on the size of the bird. Also, chickens share nests. Thats why you can get 9 chickens into 3 nesting boxes. 3 chickens per nest.

-It should have an attached run. Unless you are free ranging your birds, you really should have a run. The run gives them space to scratch, sun bathe and take dust bathes. It also gives them fresh air and access to bugs. It gets them “out of the house” so they aren’t “all cooped up”. I would say that even if you are free ranging, you should have a run. Sometimes the chickens need to stay safe and confined. Please keep in mind that most predators can tear through chicken wire. Chicken wire is made to keep chickens in, not to keep predators out.

-Food and water? I don’t keep food in the coop or the run during the night. I feed my girls fermented feed in a dish, twice a day. They eat every crumb which keeps the mice from being tempted to visit. I keep water in both the run and the coop. I made drinking jars with watering nipples. They were made properly so they don’t leak and the chickens can’t knock them over or spill them. The jars are also closed containers so the water stays clean. Your chickens should always have access to water. No discussion on that.

Here are a few things I learned on how to make your coop the most functional. Build the coop tall enough to stand in. Don’t build it so you will be hunched over. You will be in there a lot. Take care of yourself.  If you are building it off the ground, make it waist heigh so that you aren’t hunched over when your cleaning it out. Have access doors that allow you to reach every part of the coop. My coop has a door on 3 of the 4 walls for easy cleaning. Use Laminate to cover the floor of the coop. This makes cleaning easy. This is the best investment I made in the coop after the roofing. Screen the coop with bug screen as well as hardware cloth. I know that sounds crazy but mosquitoes and flys can make you chickens ill. I’ve even read of a story where a flock were killed over night by biting flies. You can get screening for next to nothing. I suggest aluminum screening to prevent tearing. You can buy it here.  One last tip, the human entrances and exits need to open into the coop/pen as opposed to opening outward. Having the doors open inwards will help prevent the chickens from escaping.


Here are a few photos of my chicken coop set up. The lack of poop and dust shows that this is before the chickens moved in. It is not perfect. I find myself improving it often. What does your set up look like?20140425_193518


20140425_193700 20140425_193605 Do you have any tips for building a coop? Please share by commenting 20140425_19381020140425_194030below!