Easy Elderberry Syrup

Elderberries are one of mother natures strongest immunity boosters. They are extremely high in vitamin C and believed to help prevent or treat the flu.
You can purchase commercially made elderberry syrup at most health food stores or HERE (affiliate link).
Or for a fraction of the price you can make it yourself with one of the kits sold in my store: https://www.etsy.com/your/shops/RusticityGoods/tools/listings/255013923
Here’s how:

Ingredients: (all links are affiliates)
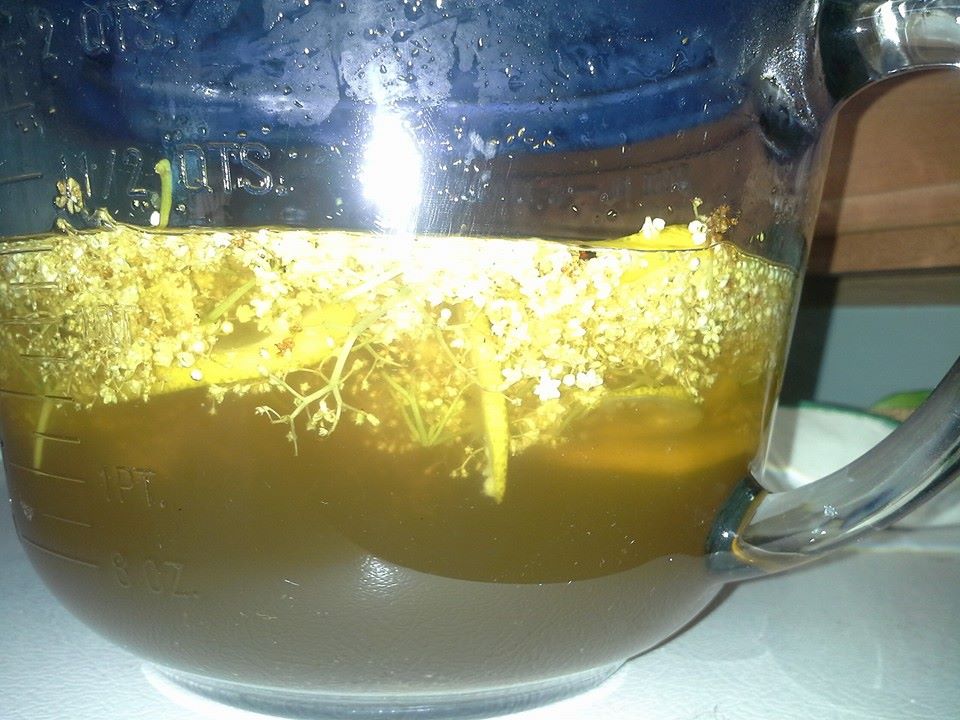
Water 3.5 cups
Elderberries 2/3 cup
Ginger Root 2 Tblspn
Cinnamon 1 teaspoon
Cloves 1/2 tspn
Lemon slices (3) optional
Honey  1 cup (BUY LOCAL!!!)

Add water, elderberries, ginger, cinnamon, cloves and lemon slices to a pot. Do not add honey yet. Do not cover the pot. Bring to a boil then reduce to a low simmer. Stir occasionally and leave to simmer for about an hour or so. You want the liquid to reduce to about half.

IMG_20140926_100342741

Once its reduced, turn off the stove and allow the liquid to cool.
Remove the lemon slices.

IMG_20141004_090102371 IMG_20141004_090128175
Drape a clean cloth over a bowl and pour the contents of the pot into the cloth. Allow it to drain.

IMG_20141004_090323799
Pull the cloth closed then squeeze the remaining juice from the cloth, into the bowl.

IMG_20141004_091456802
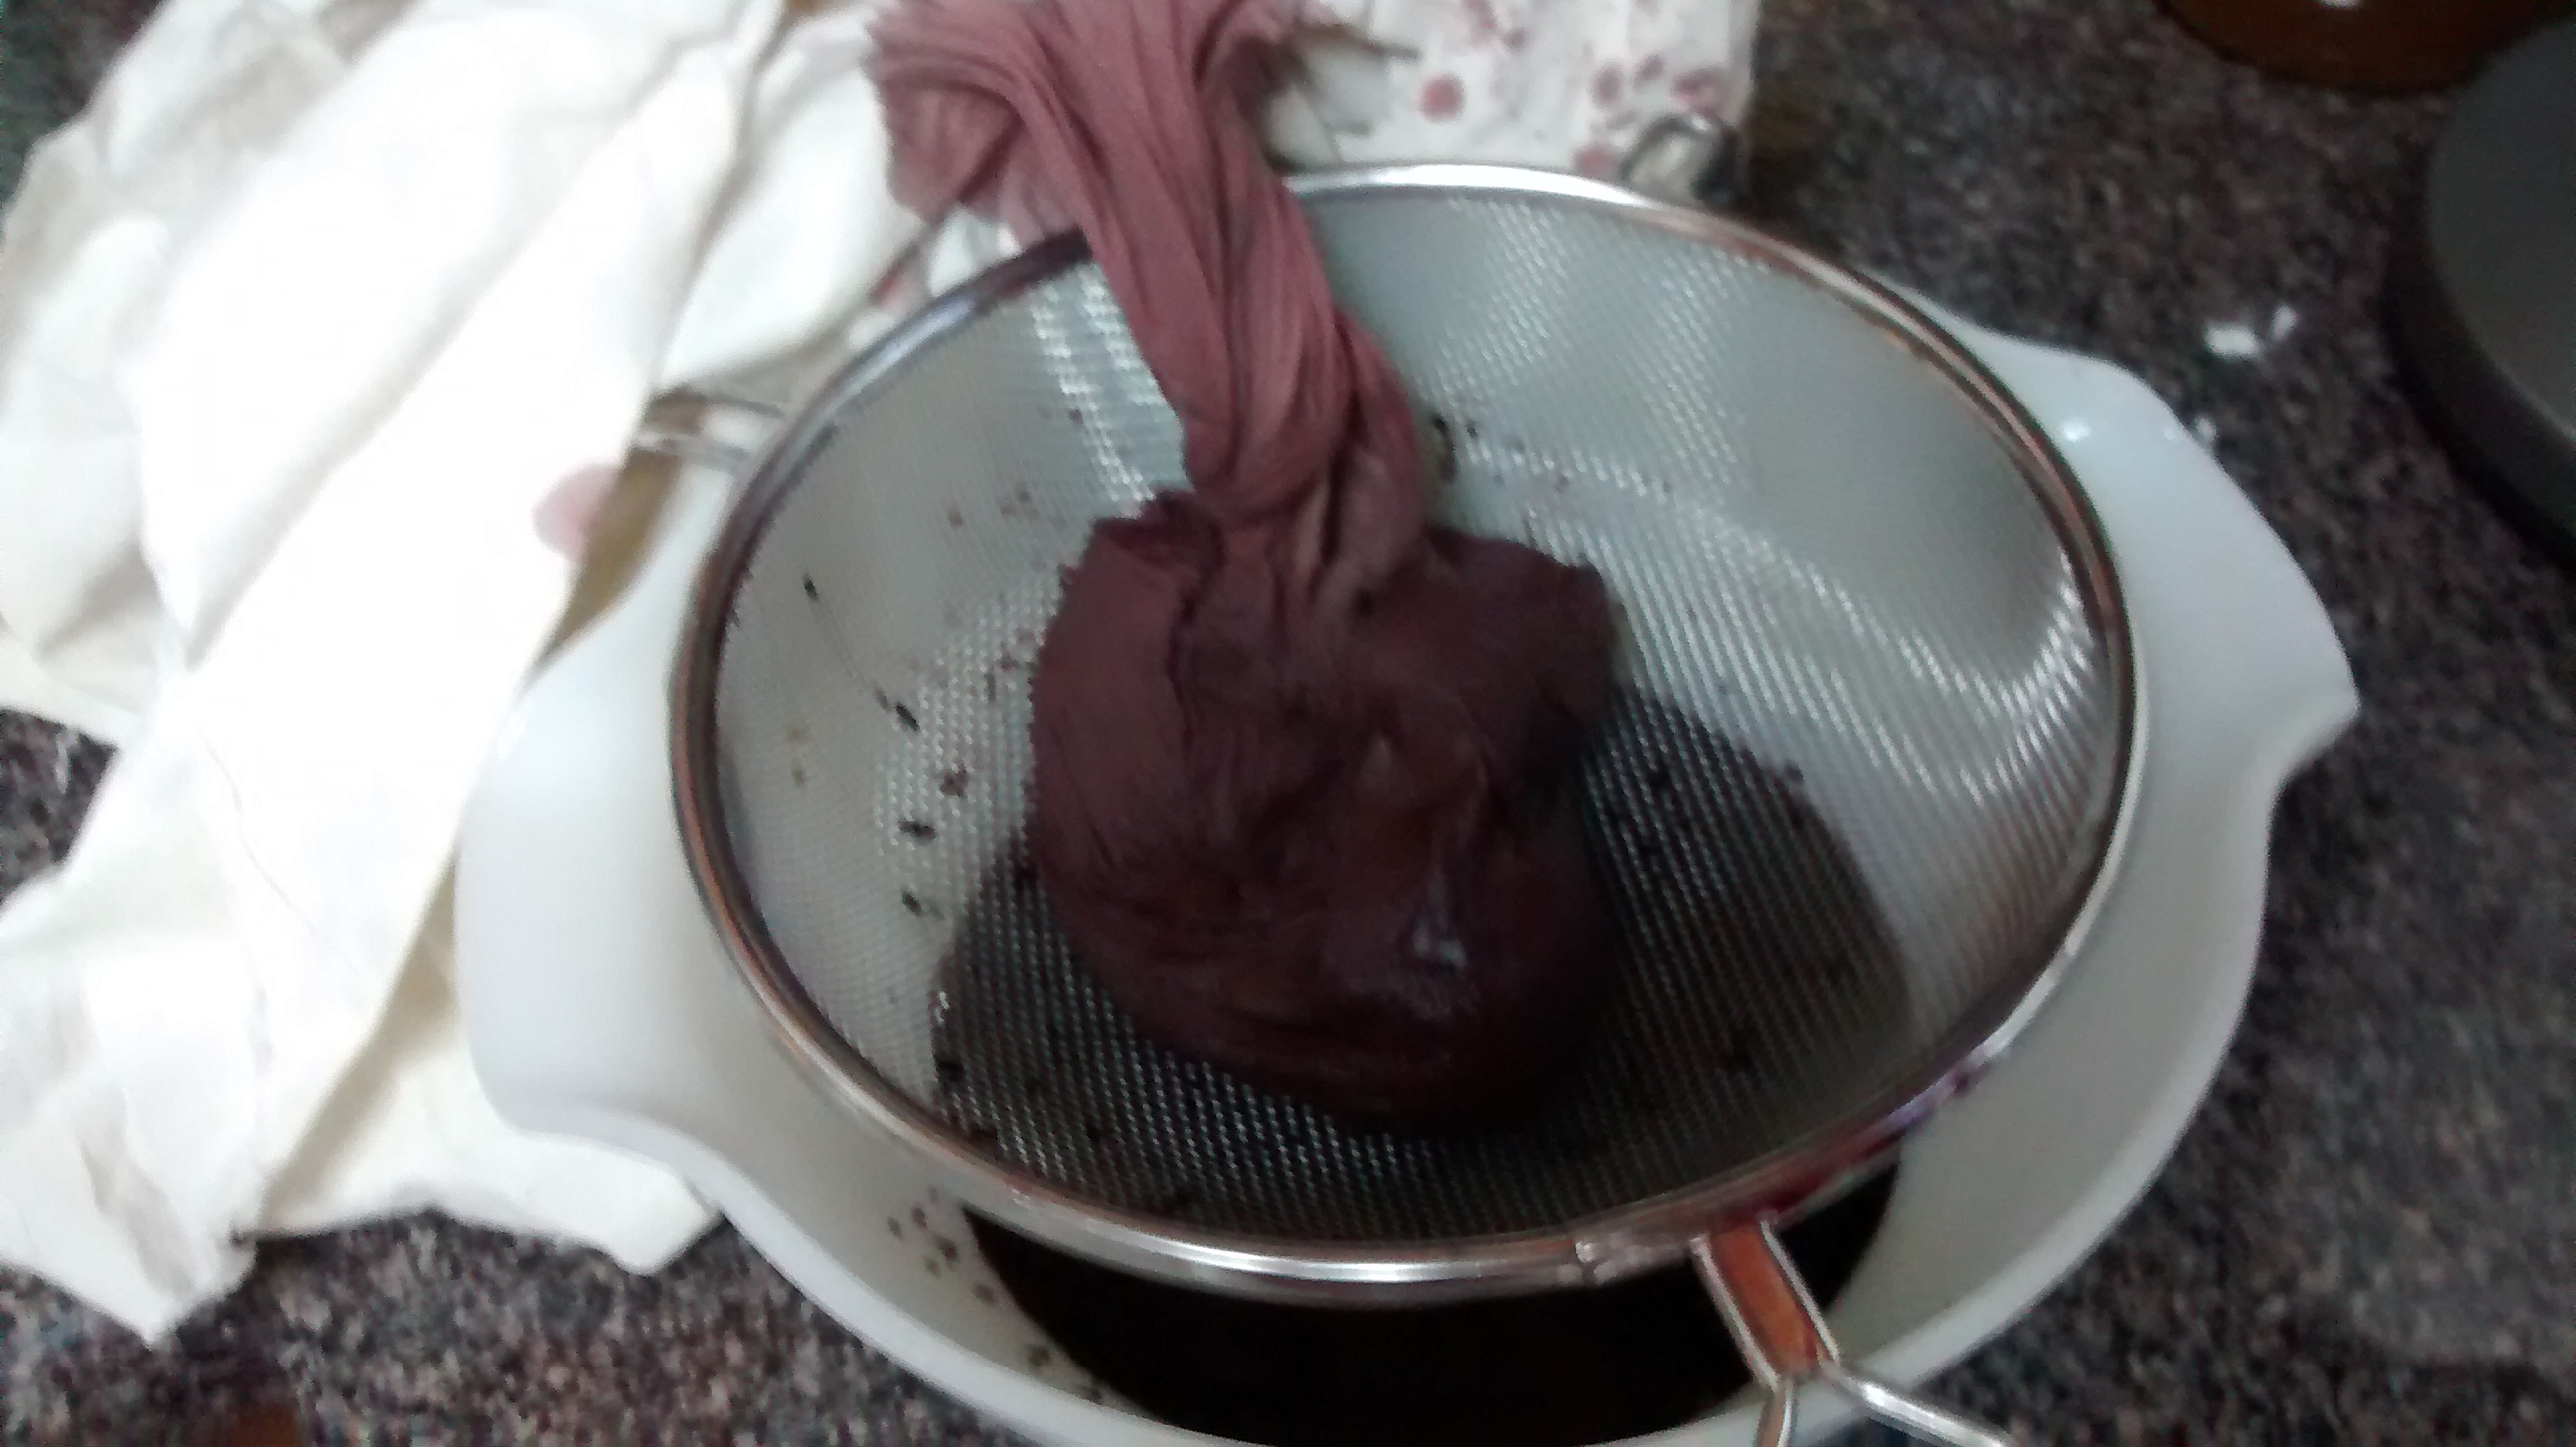
Compost the contents of the cloth, or feed it to your chickens.
Add 1 cup of Honey to the liquid. Stir until honey has dissolved and mixed well.
Ta-da! You now have elderberry syrup!
Pour into a glass container. Keep refrigerated.

Dosage:
Preventative:
Adults 1 teaspoon daily.
Children 1/2 teaspoon daily.
Flu/cold treatment:
Adults 1 teaspoon every 4 hours.
Children 1/2 teaspoon every 4 hours.

*This post was submitted in the Wild Crafting Wednesday Blog Hop. Check it out!
http://mindbodyandsoleonline.com/herbal-information/162nd-wildcrafting-wednesday-peoples-choice-award-winners/comment-page-1/#comment-244328*

Power Tools for Women. Review; Ryobi Tool Set.

Ryobiset

I am a handy woman but I wasn’t always.

I remember the first time I needed a piece of wood cut but my husband wasn’t home to do it for me. Then I thought to myself “my husband isn’t here to do it for me?!!! Why can he do it but I can’t?!!!”

So I went into the garage and looked around for what I thought was the tool I needed for the job.

It was electric.

Plug it in.

Draw line on wood where I want it cut.

Hold it steady.

Pull the trigger.

Wow! It cut the wood! Oh my gosh I cut the wood!

I was cutting all sorts of things after that. Its so funny, one minute of teaching myself how to use a “man’s” tool opened up my whole world.

My husband sure does regret not being home that day because he hasn’t had his tools to himself since! HAHAHA

Since then I have evolved a little. I started with some no name brand jig saw to a circular saw. I think the circular saw is my tool of choice for pretty much anything that needs cutting. Also the only tool I have right now for carpentry projects that I would like to look somewhat decent. I have plans to get a chop saw sometime soon hopefully. For now I will do what I can with what I have (and I actually love this circular saw too!)

At our homestead we have the Ryobi 18 volt circular saw.

Its fairly light weight which is great for me since I don’t have very strong wrists. Its very easy to use and understand. It cuts nicely and has multiple safety feature so you don’t accidentally cut your fingers (or toes) off.

We have this circular saw as part of a 5 Piece tool set. You can find it at Home Depot or HERE. We’ve had the set for at least 3 years now and it still works like new. The batteries hold their charge like they are new. I’m very happy with the quality of this tool set.

This circular saw has been my go to tool and I highly recommend it for women for its light weight and ease of use.

I also love the sawzall (reciprocating saw). It has come in handy for all those odd jobs and its great for yard work too. Again, a simple design that is easy to use and is light weight.

The drill is great. But I will say that it feels a little heavy for me, but its manageable. There are smaller drills available on the market but if you want a drill that has a decent amount of power, you aren’t going to find one lighter than this. Again, simple design and easy to use. I can’t complain.

I have never used the impact drill. I haven’t had a need for it. But my husband has used to and it worked. We still have it. That’s all I can tell you about that. You can find sets with out the impact drill at Home Depot or HERE.

Over all, this is one of the best investments that we have made as far as machinery is concerned.  Both my husband and I used it almost daily. WE have definitely gotten our money out of this set.

Easy Banana Jam

Don’t. Let your ripe bananas go to waste. Use this jam with your peanut butter sandwiches, on top of ice cream or in banana bread recipes (adjusting the sugar requirements).

image

Ingredients:
8 medium ripe bananas
2 cups of sugar
Citric acid (1 tspn per cup of mashed banana) or 2 tspns of lemon juice.

In a large pot add bananas and sugar.
Mash them babies up.
Add citric acid/lemon juice.
Mix well.
Bring to a boil.K
Reduce heat to simmer.
Stir frequently until jam is desired consistency.
Ladle into sterilized jars.
Water bath can for 10 minutes.

image

Swinging Chickens! DIY Chicken Toy.

Believe it or not, there is a chicken swing on the market. Once the chickens  get used to the swing, they seem to really enjoy it. But I was not willing to pay for something I could make myself!

What you need:
3″+/- diameter, straight(ish) Branch
Outdoor rope
Drill
Drill bit large enough to accommodate the rope

image

Here’s how to do it:
Drill a hole, about an inch from the end of each end of the branch. Try to keep them linear so the branch will hang straight.

image

Insert rope through drilled hole. Tie a tight knot on bottom side of branch.

image

I like to melt the fibers of the rope just a bit so be sure the knot doesn’t slip.

image

Leave the rope long enough to hang your swing about 6″ from the ground PLUS at least 3 feet for tying the swing to the desired branch.

Repeat this process on the other side of the branch. You may need to melt the threads at the end of the rope to help it get through the drilled holes easily.

Tie the swing to the branch. Here’s how I did it, but with 3 loops rather than 4.

image

Trim the rope with about 2″ of excess. Melt the end of the rope threads to give it a nice finish.

image

image

image

I bribed my girls to try out the swing by tying a bunch of lemon balm to the ropes of the swing. They weren’t buying it.

image

Update:
Today was day 2 of the swing introduction. I didn’t see the girls on the swing but I did see them scratching the ground around it. Later in the day I noticed the lemon balm missing. Someone had to climb up there to get it!

Update:
Today is day 4. They are finally giving it a try!
image

Easy Wild Blackberry Jam – Pectin Free

Delicious and easy.
4 cups blackberries
4 cups sugar
2 teaspoons fresh lemon juice

Combine all ingredients in a large pot. Once the berries soften, crush them with a potato masher (or whatever works for you).
Bring to a boil. Reduce to a simmer.
While simmering continuously stir for 10 minutes.
Test the set by dipping a metal spoon in the jam. Set the spoon in the freezer for 5 minutes. If you are happy with the consistency, ladle into sterilized jars. Water bath for 10 minutes.

image

Get Drunk on Flowers.

Ok, you need more than flowers but hey, the title got you here.

We recently made a batch of Elderberry Flower Cordial. I found the recipe at Food.com.

Well, since I’m new to fermenting, I didn’t have the cordial in a warm enough place to ferment. We ended up with a fizz-less, over sweet alcoholic syrup. Basically useless to me because I don’t like terribly sweet things, and I’m not going to give my kids alcohol syrup on their pancakes.

So, I added an additional 1/2 liter of water (a bottle of purified water that was room temperature). And found a proper place to ferment it. Left it there for a week and I opened the most wonderful bottle of champagne I have EVER made. 😉

IMG_20140603_173401

Here is the recipe:

Ingredients:

15 large Elderberry Flower Heads, Shaken to remove bugs

4.5 Cups of Sugar (I prefer Morena Pure Cane Sugar. It has an amazing flavor all its own and it is much better for you.)

1 Lemon thinly sliced

5 cups boiling water

1 clean, plastic soda bottle with lid


Place flower heads in the bottom of a large bowl.

Lay lemon sliced on top of flowers.

Dump sugar evenly over lemons.

Pour boiling water over lemons.

Mix until sugar is dissolved.

Place lid on bowl or cover with plastic wrap.

10409733_732065450170111_4089010133746505882_n

Leave the container on your counter for 4 days.

Every day for the next 4 days, remove cover, mix and squish the lemons.

By day 4 you should have a little fizzy action going on.

Filter the liquid from the flower mix into your soda bottle.

Place cap on tightly.

Leave the soda bottle to ferment  in a warm/dark place for the next week. My fermentation spot ended up being the upstairs linen closet. Try to find a place that has a fairly consistent temperature.

Check occasionally for fizziness. The bottle will expand as the gas builds. You may need to release the gasses to prevent the bottle from making a huge mess in your linen closet………. *cough* (joking, that didn’t happen to me but it could).

By the end of the week you should have a lovely, floral champagne.

IMG_20140616_170153

I think next time I will try reducing the sugar. I feel it lacks that crispness of champagne because of the sugar. But as I said, I don’t like overly sweet things. You could try reducing the sugar. Remember that the amount of sugar used has a direct effect on the fermentation. This was my first time making this, and I really have very limited experience with fermentation so please don’t expect more than this from me… hahaha.

Do you have any fermentation tips to share? How did your elderflower champagne turn out? Please comment and let me know!


Design Your Own Rain Boots

We love rain boots. They are our choice of foot wear on this homestead.

My youngest daughter wanted a pair of Boston Terrier rain boots but I wasn’t willing to pay the prices some companies were charging. We decided to make our own.

First I found a pair of cheap, plain black, rubber rain boots. The boots have to have a mat finish. No glossy surfaces.

Then I did some research. I read a few blogs that gave directions on how to do it but all the reviews said that the paint peels off or cracks very easy. It became obvious that acrylic paint won’t work. I needed rubber paint.

I researched rubber paint. Which lead me to LIQUID ELECTRIC TAPE!

I made a trip to Home Depot and found a small selection of 3 colors of liquid electrical tape. White, green and red. I was a little disappointed because I really wanted black (how can you have a Boston Terrier without black?) but they were sold out. I grabbed a bottle of white.

Next I drew my design on a piece of card stock. I carefully cut the design out with an exacto-knife. I now had a template.

I positioned the template where I wanted them on the boot, and traced it with a pencil.

Since I didn’t have black, I filled the entire tracing in with the white liquid electrical tape and added black details with a Sharpie. I used a paint brush to apply the liquid electrical tape. It worked just like acrylic paint, but a little thicker and I had to work quickly because it dried fairly quick.

We have had these boots now for 6 months and the liquid electrical tape is still right where I put it. No cracking or peeling. They’ve waded through puddles and ran through grass. They’ve had chickens pecking at them and dogs scratching them. Still attached perfectly The Sharpie has faded a bit. I would definitely use the black liquid electrical tape if I weren’t too cheap and lazy to go buy a bottle.

You can make any design you choose! Have fun! Please share a picture with me when your done!

Easy Herb Gelatin Treats for Chickens (or humans, I guess!)

With the heat on the rise I have been looking for ways to help keep my small flock cool.

Fresh Eggs Daily had a great post on Beating the Heat. This is my favorite chicken site. Tons of information. The post gave me an idea. I could make Homemade Healthy Gummie Snacks for my chickens! They were such a hit with the kids, the chickens were bound to love them!

I found out that not only could chickens eat gelatin, but gelatin is actually good for them. Just like in humans, gelatin helps support health hair, skin and nails. It is also aids digestion and soothes the digestive tract. Sounds like a winning combo for chickens. And to clarify, gelatin is made form the bones and hooves of bovine. It is not made from chicken products. No cannibalism here.

You can make these treats from the herb of your choice. Or you could not use herbs at all. Maybe just use fruit. Or a fruit herb combo. How ever you make them this is a healthy treat that can help your chicken keep its cool.

IMG_20140609_081118939 (1)

Ingredients:

2 cups herbal infusion (How to make a Water Infusion)

1 cup cold water, fruit juice, or fruit puree (I used strawberries and blackberries (this is a great opportunity to use up that frost bitten fruit you have in the freezer ;))).

4 packs  unflavored 1/4 oz gelatin (you buy it here or any grocery store in the Jello section)

First thing you need to do is make an herbal infusion. Since I want to cool my chickens I decided to go with mint. It has natural cooling properties. Since mint is a strong herb, I only filled my infusion jar 1/4 of the way.

Bring your finished infusion to a boil in a 2 quart pot.

Remove from heat.

Slowly add gelatin while mixing.

Blend with an immersion blender until smooth. If you don’t have an immersion blender, just blend it by hand with a wisk or fork. I love my immersion blender and I highly recommend one. You can buy the one I have here or at walmart.

Add cold water juice (or fruit juice or puree).

Blend until smooth.

Pour liquid into a greased, 3 qt 9×13 casserole dish.

Place casserole dish in fridge.

Allow to sit for 1-4 hours (or until firm).

Cut into squares the size of your choice. I like 1/2″ squares.

Serve to chickens.

Watch the chickens steal them from each other and chase each other for the last bit! They LOVE THEM! I tried them as well. I don’t prefer mint jello but I can tell you for sure it has that great cooling effect!

If you made  your own flavor and the chickens didn’t like it, you can put the cubes back into the pot and reheat them until liquid. Try adding something you know they love, like strawberries or bananas. Then re-pour, refrigerate and serve again. Have fun! Try new flavors and let me know which one your chickens like best!

Here is my flock enjoying their gelatin treat! Ravenous!

IMG_20140609_081233860 IMG_20140609_081235435 IMG_20140609_081239666 IMG_20140609_081242348

Look how sad my little Mango is. The girls stole all the treats! 😦


How to Make a Water Infusion

Infusions are a away to make the qualities of an organic item infusion into water. You can make infusions out of pretty much any fruit,vegetable, flower, herb, leaf or bark, etc. Just please make sure what you are infusing is not toxic or poisonous. Do research on the item and get confirmation from an experienced individual before you make your infusion.

What you need

1 quart size glass jar with lid

2 cups of boiling water

item to be infused (usually 2 cups. NOTE:Some Herbs, like mint, Have a very strong flavor , you may want to use less of the herb. You can use as much or as little as you’d like). Make sure the item has not been sprayed/treated with pesticide/herbicide

My Method:

I fill the jar with the item to be infused (say white clover because I love White Clover Jelly). I stuff that jar with just the flower, removing as much greens from the flower as possible.

Most people will rinse the flowers to get any little bugs that may be hiding in the flowers. I just kinda shake them off before I stuff them in the jar. I don’t like the idea of washing away any of the pollen or nectar that are in the flower. BUT if you don’t like the idea of ant infused water, go ahead and give the flowers a quick rinse and put them back in the jar.

Pour 2 cups of boiling water over the flowers in the jar.

Put the lid on the jar.

Leave the jar to sit for 4-24 hours.

In a fine strainer, muslin cloth or cheese cloth, strain the water from the flowers into a bowl. Squeeze the liquid from the flowers, through the strainer, to be sure you get all the goodness. (Side note, you can feed the left over flowers to your chickens)

You now have a fusion. TA-DA!

This fusion good for about 24 hours when kept in the fridge. The older a fusion is the less of the qualities of the item infused will remain. Basically, use it or lose it. If you can’t use it right away, freeze it! You can leave it in your glass jar (with room for expansion) or make ice cubes. The qualities will be less, but it is better than wasting.

I am not a professional. I am not a doctor. I am not telling you to do this.


Make Your Own Citrus Coop Cleaner

Ingredients:

The peel of 2 oranges, or 3 lemons, or 4 limes, or maybe 1 grapefruit? I don’t eat grapefruit so you guess on that one.

White vinegar

1 quart mason jar or bigger. Use what you have, just try to use glass or food grade plastic. You could even use the vinegar bottle.

Place citrus peels into the container of your choice. I had left over orange peels from my Homemade Healthy Fruit Gummies recipe.

Leave the vinegar mixture to rest for about a month. Shake it occasionally.

Filter the vinegar into a spray bottle.

Use the citrus vinegar spray to clean your kitchen or to clean your coop when you are giving it that occasional deep clean.

This stuff smells fantastic and has all of the wonderful benefits of white vinegar.

I got this recipe from my favorite chicken website Fresh Eggs Daily. She added cinnamon sticks and vanilla to the vinegar and oranges before allowing it to rest. I bet that smelled amazing! If you haven’t checked out her site, it is worth your time. She has tons of chicken recipes and raises her chickens naturally with herbs. Lots of great tips.

Try making your own scent of citrus cleaner. Just remember to use White vinegar, a citrus and nothing sticky. How about Lime/Mint or Lemon and cloves? What recipe will you use? Please let me know how it turned out!